

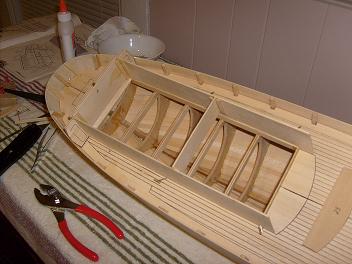
the starboard side, pictured here, has the hole cut out. I have the first bow rib in place, the rest soon followed. I also had to add extra wood, so that i could space the second bow rib.


for the outer wall, I fitted a needle nozzle in the tube of wood filler and sealed along the bulwarks. the tubes of Elmer's wood filler that i have {oak and natural} have been around a while. I had to knead the tubes like crazy, just to get some out. the natural tube, I was able to make it sit at the bottom, creating the airgap at the nozzle. I added some water.....not too much......sealed it up and kneaded the hell out of it.....I even shook it! it comes out like a paste.....I was surprised that I could use the needle nozzle on it. the little compartment is interesting....I have some ideas as to what I want to do with it. I can't go much further here, can't put on the forecastle cover because now I'm in question as to how the anchors are affixed. no matter....I can finish and paint the hull before this is done.....there are other places i can go......
I figured I'd also get started on the pilot house......bottom section. the first big problem I see right now, is that the house itself has a slope. the parts were warped a little, but I reinforced the assembly and for the moment, left it separated from the main wall at the stern. I want it to be removable for the moment for what i want to do to it later. but for now, lets get the helm platform to sit flush. I am doing all I can to keep the "separation lines" from being too prominent {I've seen other builds}. I had to be a human vise {because I don't have any} for one part of it's assembly.......had to ask my wife to get a beer for me.....but she loves me!
I also added a pillar in the center of the front wall to sure it up. I also thought about the port holes.....just how much light will be in there. I made a floor for the open area in the middle. I've had suggestions on lighting, but I will hold off on that for now......I want to do a few kits first. my next task is to do just that, fitting the helm platform.....can't wait to see how i get out of this one. I'll be working on the stern parts when I begin, because it also depends on how they fit too.


No comments:
Post a Comment